#TN052
#Summary
Installing Navionics charts - For Navionics cartridges post 2012
Note: This requires the seaPro Navionics option
Important If you receive an error 301 or an unknown error.
This can occur if using a new or updated cartridge or on a system were the cartrige has not been installed previously or if the system has been updated and Navionics security lost.
Navionics have modified their security system and their server may return an 'unknown error' or an 'error code 301'.
If so, you will need to contact the Navionics help line to install their copy protection for the cartridge.
Please email help@navionics.com quoting error 301
Installing on Windows 8, 10 and later
The remote Navionics security server/library does not correctly deal with Windows 8 or above.
Use the work around below to run seaPro in Windows 7 compatibility mode and Administration rights..
This only needs to be done during the Navionics installation and should be reset once installation is done.
a. Right click on the seaPro launch icon
and select properties and then the Compatibility Tab.
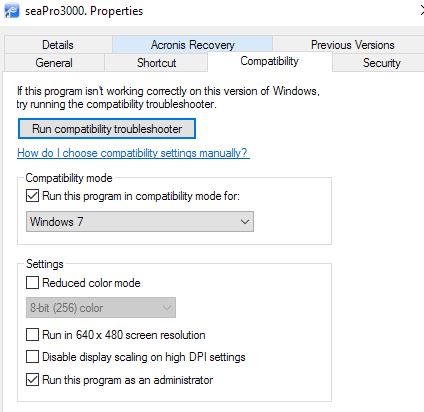
b. Set compatibility mode to Windows 7 and tick Run as Administrator, press OK
c. Start seaPro and install Navionics as previous.
Important
Once installed reset compatibility mode to normal by unticking the 'Run this in' above tick box.
If this is not done seaPro may not work correctly.
Installation:
1. Remove any Navionics cartridges from the reader
Check any other readers do NOT have any cartridge or any other removable media inserted
2.
Start seaPro go to Chart->Settings Chart the Chart Directories tag and check that the Navionics folder is ticked.
3. Then Navionics tab,

Check 'Convert charts in background is ticked' and Auto is ticked.
4. If a new installation press ‘Reset All’ button’ to clear out any old data. or delete the appropriate previous installation. Close the dialog.
If using Window 8 or 10 see note further down before preceding
5. Insert the Navionics cartridge into the reader, seaPro will then detect the cartridge and ask if you want to install them.
Enter a name and its suggested you untick copy images.
6. Repeat for each of your cartridges you need to install.
If you have older Navionics cartridges (pre 2012) then you will need the Navionics special card reader
1. Remove any Navionics cartridges from the reader
2.
Start seaPro go to Chart->Settings Chart the Chart Directories tag and check that the Navionics folder is ticked.
3. Then go to the Navionics tab, and check that the 'Convert charts in background is ticked and press the ‘Reset All’ button’ to clear out any old data.
Close the dialog.
4. Insert the Navionics cartridge into the reader, seaPro will then detect the cartridge and ask if you want to install them.
5. Repeat for each of your cartridges you need to install.
Note:
1. When you start seaPro you will occasionally be asked to re-insert the Navionics cartridges, simply insert each cartridge in turn.
The cartridges don’t have to be left inserted, this is a Navionics check that you still own the cartridges.
You can then continue to use them in your hardware chart plotter etc on the same vessel.
2. if you can't see the Navionics options, check that you have purchased and installed the unlock codes for the Navionics option
How to reset the Navionics chart registration on, Windows 7, 8 and 10
1. Ensure seaPro is closed.
2. From the main windows desktop, click the Windows start button in the bottom left
Or you may need to use the search icon
3. Type %AppData% into Window’s Start Menu Search field and press Enter.
Basically the above is taking you to the folder
C:\Users\usernameXXX\AppData\Roaming\Navionics
4. This should start windows/file explorer and show a list of directories, find the
Navionics directory and double click it to open the directory and show the files.
5. Delete the files NCRRKey_2.nky and NCRRKey_1.nky if either files exist by right clicking each file and selecting "Delete".
Press 'Remove all' to clear out old data, you will be asked to rebuild the folio b
![]()
7. Re-install the Navionics data, by inserting the cartridge and following instructions (above)
Note:
seaPro must be running in Windows 7 compatibility mode due to Navionics servers not supporting Windows 10
Ensure you have internet access (only while installing, once the folio is built you don't need to be connected